Quality optimization
Image quality can be considered as a measure of the visual perceived quality of the image. It is usually measured on scale of 1 to 100, with 100 indicating the highest quality and 1 indicating the lowest quality. Image quality and image size are directly related to each other. Higher the image quality, higher the image size.
Thus, image size can be significantly reduced by delivering an image at a lower quality. Human eye often cannot perceive pixel level changes to an image. This can be used to our advantage as in almost all cases.
Let's take for example the following images
1. At image quality 100 in JPG format
This image is 112KB in size
http://ik.imagekit.io/demo/img/tr:w-300,q-100,f-jpg/medium_cafe_B1iTdD0C.jpg

2. At image quality 80 in JPG format
This image is only 28KB in size. That is a reduction of 75% in size from the image with quality 100.
http://ik.imagekit.io/demo/img/tr:w-300,q-80,f-jpg/medium_cafe_B1iTdD0C.jpg

While the image with quality 80, is 75% smaller in size, it looks exactly the same and it is very difficult for the human eye to be able to find out changes between the two.
When you start with ImageKit, the default quality is set to 80. This means that images with higher quality would automatically be brought down to quality 80, thereby reducing their size while still maintaining good visual quality for your users.
Certain industries, like the e-commerce industry, are slightly more sensitive towards the image quality and prefer to have it set to a slightly higher number like 85 or 90.
There are two ways in which you can change the image quality -
1. Change default image quality from the ImageKit dashboard
a. Go to "Image Settings" > "Optimization".
b. Make sure the "Optimize image quality before delivery" setting is turned on. Then select the desired quality level from the dropdown menu below. The default is set to 80.

c. Click on "Save" to update the default quality level. It applies instantly to all images that are not cached on the ImageKit CDN.
If you do not want ImageKit to change the quality of the images, then you can simply turn this setting off from the dashboard.
2. Change image quality using the quality transformation parameter
You can also change the image quality by specifying the quality parameter directly in the image URL. The quality transformation in the URL overrides the default quality setting specified in your ImageKit dashboard. This is particularly useful, if you want to apply the default quality optimization on all images, but have a few images where you want to have a different quality level
Syntax
q-<number>
Here 'number' is any integer from 1 to 100
URL example
http://ik.imagekit.io/demo/img/tr:q-80/medium_cafe_B1iTdD0C.jpg
Note - Never set the image quality to 100. It will lead to a higher image size, without much perceptible improvement in the visual quality of the image.
Chroma Subsampling Optimization
Chroma Subsampling is an optimization technique that is used for encoding of JPEG images. This technique takes advantage of the lower sensitivity of human visual system towards color (chroma) than towards brightness (luma). You can read more about chroma subsampling here.
It is generally recommended to use 4:2:0 chroma subsampling on all images for smaller size. But in certain cases, especially the ones with a very bright object in the foreground over a completely white background, it introduces unwanted image artefacts i.e. your while the size is smaller, the visual quality goes down as well.
Because quality of the image is our utmost priority, the setting “Use chroma subsampling 4:2:0” is kept “off” by default. This means that we do not use chroma subsampling on the image by default. This may result in other web analysis tools like Google PageSpeed Insights, show that your images can be further optimized. But remember, it may come at an expense of visual quality, especially for e-commerce like product images.
However, if your images look fine with this setting turned “on”, then you can use it on all your images without worrying and enjoy even better compression ratios on your images.
Changing the chroma subsampling optimization from the dashboard
1. Go to "Image Settings" > "Advanced".
2. Turn on the "USE 4:2:0 CHROMA SUBSAMPLING" setting if you want ImageKit to apply subsampling to your images and get a smaller output image size.

3. Click on "Save" to persist these settings. They get applied automatically to all subsequent image requests that are not cached on ImageKit's content delivery network.
Data-Saver Mode for image quality
Mobile browsers such as Chrome Mobile and Opera Mobile, allow the user to activate a data saver mode. With this mode enabled in the user's device, the browsers sends a Save-Data header with the request, with the value set as on.
As mentioned in Google’s post about the Save-Data header,
By identifying this header, a web page can customize and deliver an optimized user experience to cost- and performance-constrained users.
This is exactly what ImageKit allows you to do.
If a user is using the data saver mode in his browser, ImageKit compresses the image even further. This reduces the size of the image to ensure faster delivery and lighter resources for that user. If a user doesn’t use the data saver mode, he continues to get the same image as all the other users. Exactly the same URL is used to cater to different performance requirements of different users.
The support for extra compression for Data-saver mode is completely opt-in. To enable extra compression for your users using the Data-saver mode on their devices
1. Go to "Image Settings" > "Optimizations"
2. Change the value of the setting "Enable support for Data-Saver mode" to "Yes".

3. Click on save to persist these settings. The support is automatically enabled for all images that are not cached on ImageKit's delivery network.
Let's take a look at an image with and without data-saver support enabled.
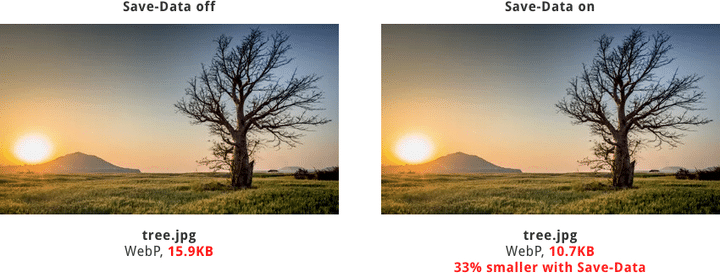
With data-saver support enabled, users with save-data mode on their devices, get a 33% smaller image.
If you have any questions about the above optimizations, please get in touch with us by creating a support ticket from the ImageKit dashboard.