Magento is one of the most popular eCommerce platforms to develop a shopping website. More than 250000 merchants use Magento to sell online. ImageKit offers a very simple integration which allows you to optimize images on a Magento website instantly.
In this guide, we will look at implementing basic image optimization (quality optimization and automatic format conversion with WebP support). The advanced integration, where we switch from Magento's resizing parameters to ImageKit's resizing parameters for better image quality and control on sizes, has been discussed in the "Advanced image optimization for Magento using ImageKit guide[link]".
Steps for basic image optimization on Magento with ImageKit
1. When you register for ImageKit, you are asked to select an ImageKit ID for yourself. The ImageKit ID is the unique identifier in your URLs for your images. Normally, your URLs would begin like this
https://ik.imagekit.io/<your_imagekit_id>/
2. Log in to your ImageKit dashboard and go to the Integration section.
3. In your current Magento store, there could be two ways of storing images - you could be either storing them directly on your server (more likely) or you could be storing your images in an AWS S3 Bucket. If you are using an AWS S3 Bucket to store your magento images, and want to optimize the images in that AWS S3 bucket, you can refer to the guide "Optimize images in AWS S3 storage with ImageKit". If you are stroing the images on your server, then you can continue following the steps below for integration.
4. Click on the "Add Origin" button

5. To integrate ImageKit with the images on your server, you need to add your server as an origin for ImageKit. For this purpose, we need to set the origin type as "Web Server - HTTP(S) server and Magento, Shopify, Wordpress etc."

6. The value of base URL should be your website's address with the protocol (http or https) in the beginning. For a website that is accessible on https://my.magentostore.com, the image URLs would also begin with https://my.magentostore.com. The same should be the value of the base URL as well.
7. Click on Submit.
(You can refer to the use of the field "Include Canonical Response Header" amd "Forward Host header to this origin" here[link])
8. In the “Image URL Patterns” section, you will find this new source added in “Image Origin preference” list with the “Default URL pattern”. In the screenshot below, the origin "My Magento Website" now appears in the origin preference list.

9. Before we move to the next step, we will verify if the images on your Magento website are now accessible via ImageKit.
For example, if the image URL on your current Magento website is
https://my.magentostore.com/media/catalog/product/k/l/kljjwj60021874-1_1.jpg
and you added https://my.magentostore.com as the base URL while adding the origin, then for this the URL via ImageKit will be
https://ik.imagekit.io/<your_imagekit_id>/media/catalog/product/k/l/kljjwj60021874-1_1.jpg
Here, we have replaced the value of the base URL, https://my.magentostore.com, with, https://ik.imagekit.io/<your_imagekit_id>.
You will need to replace <your_imagekit_id> with your own ImageKit ID.
If the above change does not work for your images, then you can get in touch with our team to help you with the integration by creating a support ticket from your ImageKit dashboard.
11. If the above image did work correctly, we can now proceed to make the changes in our Magento admin panel to switch the image delivery and optimization to ImageKit. In Magento 2, go to Stores -> Configurations -> Web.
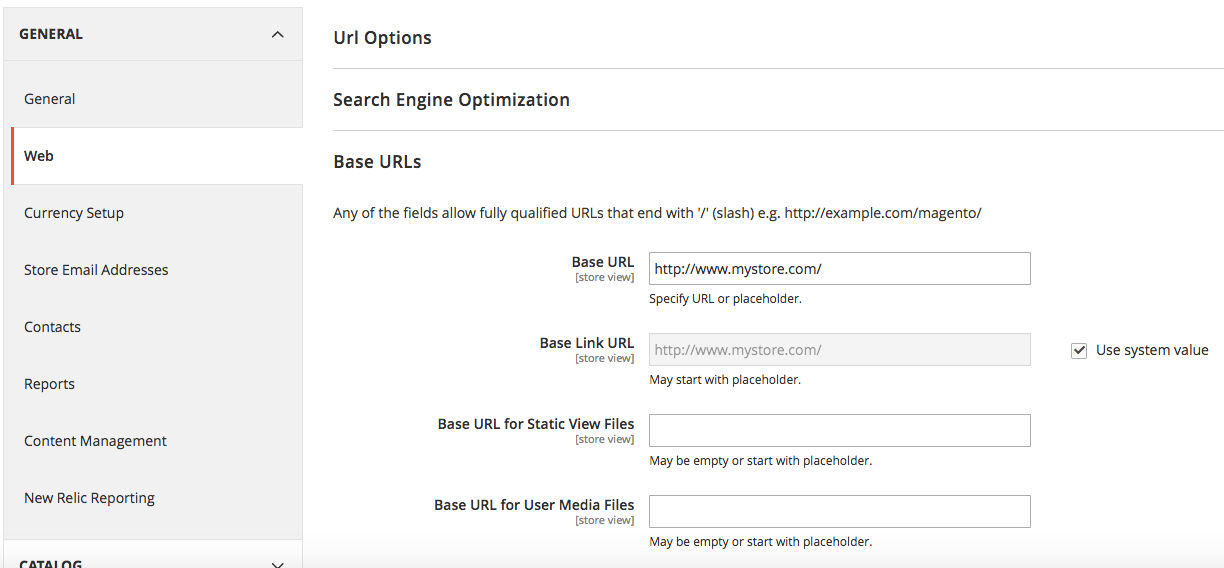
12. Under Base URL for User Media Files field, enter https://ik.imagekit.io/<your_imagekit_id>/
You need to replace <your_imagekit_id> with the ImageKit ID for your ImageKit account.
13. If you want to use ImageKit to serve CSS and JS files as well, to speed up their delivery, then enter http://ik.imagekit.io/<your_imagekit_id>/ in the field Base URL for Static View Files and https://ik.imagekit.io/<your_imagekit_id>/ in the field Secure Base URL for Static View Files.
14. Save these settings and clear the cache for your Magento store (if any). Now refresh the webpage for your Magento store and check the image URLs. They should now load from URLs beginning with https://ik.imagekit.io/<your_imagekit_id>. You can use the Chrome Developer Tools to check that all the images are being loaded via ImageKit and that all images are loading correctly.
15. This change alone would reduce the image size by 20% plus. If you also want to improve the quality of images on your Magento store, you will need to follow the instructions in the "Advanced image optimization for Magento using ImageKit guide[link]". Our customers have observed much better image quality after switching to ImageKit's resizing parameters.
We are always there to help you in case of any doubt. You can create a support ticket from your ImageKit dashboard and our team will help you with the integration.
Read how to use ImageKit's transformation parameters to resize the images and get better image quality for your Magento e-commerce store here "Advanced image optimization for Magento using ImageKit guide[link]"
